PCサーバーにUbuntu 16.04を導入してWordPressを動かす。(1/3)
PCサーバーにUbuntu 16.04を導入してWordPress環境を構築・運用する方法を説明します。PCサーバーは自宅に設置するため、コンパクト・静音・低消費電力・低発熱が条件で、ACアダプター電源のファンレスベアボーンPCがおすすめです。CPUはCeleronかPentium、メモリは4GB~8GB、HDDは500GBもあれば余裕です。本体、メモリ、HDDで35,000円~40,000円で購入することが出来ます。なお、ベアボーンPCはLinux(64bit版)が動作することをスペック表で確認してください。また、サーバーは常にログを書き込むため、SSDは適しません。
Shuttle DS68U
https://www.amazon.co.jp/gp/product/B01JZJ581C/ref=oh_aui_detailpage_o01_s00?ie=UTF8&psc=1

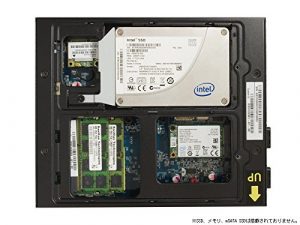
- 本体にメモリ(2枚)とHDDを取り付ければ完成です。放熱性の良い金属製の筐体に安定感のある大きめのスタンドが付いています。
※1/3では、phpの設定まで説明します。
1.OS D/L & install
https://www.ubuntulinux.jp/download/ja-remix
ubuntu 16.04 日本語64bit版をD/L
ubuntu-ja-16.04-desktop-amd64.iso(ISOイメージ)
※Desktop版ですが、WordPressの稼働に問題ありません。Desktop版にはVNCが挿入済みのため、Windows PCからRealVNCで操作することが出来ます。
USBメモリにインストールメディアを作成(16GB以上)、USBメモリから起動する。
https://universal-usb-installer.jp.uptodown.com/windows ←Windows版インストールメディア作成ツール
※OSインストール前にBIOSの設定でUEFIモードにしておくこと。
https://kledgeb.blogspot.jp/2016/04/ubuntu-1604-uefi-1-uefipcubuntu-1604.html

2.固定IPの設定
nano /etc/network/interfaces
# interfaces(5) file used by ifup(8) and ifdown(8)
# Include files from /etc/network/interfaces.d:
source-directory /etc/network/interfaces.d
# The loopback network interface
auto lo
iface lo inet loopback
# static ip 以下、追記します。
auto enp0xxxxxxx ←デバイス名はifconfigで事前に確認しておくこと!!
iface enp0xxxxxxx inet static
address 192.168.1.100 ←自分の環境に合わせます。
network 192.168.1.0
netmask 255.255.255.0
broadcast 192.168.1.255
gateway 192.168.1.1
dns-nameservers 192.168.1.1
3.パッケージのアップデート(結構時間が掛かります。)
apt-get update
apt-get upgrade
4.LAMP Serverのインストール

http://linux.keicode.com/servers/lamp.php
apt-get install tasksel
tasksel install lamp-server ←画面から実行しないこと。直接指定しないとERROR(100)になる!!
5.phpMyAdminのインストール
apt-get install phpmyadmin
[*]apache2を選択
※mysqlのパスワード設定は事前に済ませておきます。
confのシンボリックリンクを作成する。(vhostを追加…a2ensiteと同じ)
ln -s /etc/phpmyadmin/apache.conf /etc/apache2/conf-available/phpmyadmin.conf
設定内容をチェック
a2enconf phpmyadmin
※apacheのリスタート
service apache2 restart
6.Apache2の設定
http://ameblo.jp/rb26/entry-11440052587.html
cp -p /etc/apache2/sites-avairable/000-default.conf www.example.com.conf
nano www.example.com.conf
※vhostを有効にします。
<VirtualHost *:80>
# The ServerName directive sets the request scheme, hostname and port that
# the server uses to identify itself. This is used when creating
# redirection URLs. In the context of virtual hosts, the ServerName
# specifies what hostname must appear in the request’s Host: header to
# match this virtual host. For the default virtual host (this file) this
# value is not decisive as it is used as a last resort host regardless.
# However, you must set it for any further virtual host explicitly.
#ServerName www.example.com
ServerAdmin webmaster@localhost
ServerName www.example.com
DocumentRoot /home/www/example.com ←ディレクトリを作成しておきます。
# Available loglevels: trace8, …, trace1, debug, info, notice, warn,
# error, crit, alert, emerg.
# It is also possible to configure the loglevel for particular
# modules, e.g.
#LogLevel info ssl:warn
ErrorLog ${APACHE_LOG_DIR}/error.log
CustomLog ${APACHE_LOG_DIR}/access.log combined
# For most configuration files from conf-available/, which are
# enabled or disabled at a global level, it is possible to
# include a line for only one particular virtual host. For example the
# following line enables the CGI configuration for this host only
# after it has been globally disabled with “a2disconf”.
#Include conf-available/serve-cgi-bin.conf
<Directory /home/www/example.com>
Options Indexes FollowSymLinks
AllowOverride All
Require all granted ←grant設定!!
</Directory>
</VirtualHost>
バーチャルホストを有効化します。
a2ensite www.example.net.conf ←シンボリックリンクが作成されます。
/usr/sbin/apache2ctl configtest ←confチェック!!
service apache2 restart

7.hosts追記
127.0.0.1 localhost
127.0.1.1 wordpress-server ←サーバーホスト名
127.0.0.1 www.example.com
127.0.0.1 example.com
# The following lines are desirable for IPv6 capable hosts
::1 ip6-localhost ip6-loopback
fe00::0 ip6-localnet
ff00::0 ip6-mcastprefix
ff02::1 ip6-allnodes
ff02::2 ip6-allrouters
8.MySQL設定
http://qiita.com/kojionilk/items/bdace886c3664d75c5f7
nano /etc/mysql/my.cnf
#charset added ←以下、追記します。
[mysqld]
character-set-server=utf8
skip-character-set-client-handshake
default-storage-engine=INNODB
※mysqlを再起動します。
/etc/init.d/mysql restart
rootでログインして確認します。
mysql> status;
————–
mysql Ver 14.14 Distrib 5.7.17, for Linux (armv7l) using EditLine wrapper
Connection id: 4
Current database:
Current user: root@localhost
SSL: Not in use
Current pager: stdout
Using outfile: ”
Using delimiter: ;
Server version: 5.7.17-0ubuntu0.16.04.1 (Ubuntu)
Protocol version: 10
Connection: Localhost via UNIX socket
Server characterset: utf8
Db characterset: utf8
Client characterset: utf8
Conn. characterset: utf8
UNIX socket: /var/run/mysqld/mysqld.sock
Uptime: 15 sec
Threads: 1 Questions: 6 Slow queries: 0 Opens: 107 Flush tables: 1 Open tables: 26 Queries per second avg: 0.400
※ユーザーの作成
— 全ての権限を与える. 制限を加える場合は変更します。
GRANT ALL PRIVILEGES ON *.* TO (ユーザ名)@localhost IDENTIFIED BY ‘(パスワード)’ WITH GRANT OPTION;
FLUSH PRIVILEGES;
作成したユーザで MySQL にログインできるか確認します。
mysql -u (ユーザ名) -p
Enter password: # 先ほど設定したパスワードを入力します。
9.phpの設定
http://www.obenri.com/_lamp/apache_php.html
php.iniの編集
nano /etc/php/7.0/apache2/php.ini
memory_limit = 128M
post_max_size = 40M
upload_max_filesize = 30M
max_input_time = 60
※apacheのリスタート
service apache2 restart


